Tuesday, December 28, 2010

Homemade Cookie Tin Banjo, part 15

..
Keep checking the fit, and mark with a pencil the places to grind down a little. The face on the inside part was made nearly a perfect cylinder the exact same radius as the tin, so just match that.

Along with the 1 degree down angle, check to get it straight - dont want it to angle left or right altho who would really care. This ain't no professional virtuoso banjo but just something thrown together.

I milled a little rabbet into the end to accomodate the seam around the top of the cookie tin.


And as you can see, it came out very close to perfect. The neck might have been positioned a little higher, the rim sticks up just slightly above the neck.

There could be a jig that would hold this and allow it to be carved around a radius, similar to the way the inside part was carved. This method here seems easy enough for quantity one.

_____________________

Thursday, December 23, 2010

Homemade Cookie Tin Banjo, part 14

..
Back to the grindstone. I was able to create a concave cylindrical face pretty accurately by just eyeballing it, sanding and keep checking against the circle I drew on the wood with a pencil.

How did I know what size circle to draw? Very simple - I just used the cookie tin as a template. Be sure to center the tin on the plank.

You can see the inaccuracy of the board thickness in the above photo, if it were everywhere the same there wouldn't be any shadow at the curved faces.

Now, to get the face and thus the neck to slant 1 degree, I made a simple calculation: the neck + head is 57 cm long, and that length times the tangent of 1 degree comes out to be 1 cm. So by placing some little pieces of wood under the neck so as to tip it up by just that much at the far end, it's angled just right.

The fun thing is that this height is very close to half the thickness of the oak plank. So if I flip the neck over, with the same setup, the block glued on there tips it down by the exact same amount. So I can merrily grind away on it, flipping it over and back; and the face will carve out nice and straight, one degree off vertical.
_____________________

Wednesday, December 22, 2010

Homemade Cookie Tin Banjo, part 13

..
Now remember, I wanted to lean the neck back one degree or so. Let's consider the math for that. Imagine (or just look at the following diagram) the banjo laid on a table, strings down, body to the left, head toward the right. It's resting on the bridge and the body is perfectly horizontal. The neck is angled up a degree or so... we want to know exactly how much of an angle to angle it.

(Wow, this blog software aches. If anyone thinks Google is really competent, just click on the above image to see it as I created it...)

The cookie tin has a rim around the edge that sticks "up" (down, in this diagram) and we want to postition the neck so it's flush with this, or pretty close.

Now, notice that while the neck angle n and the string angle s are almost the same, they are not exactly the same. The situation is like this:
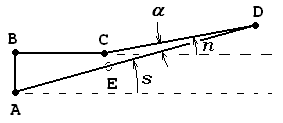
The line AD is the strings; CD is the neck. The strings' clearance CE at the rim should be about 5-6 mm but at the grin D it should only be about 2 mm. Therefore the two angles are a little different. (The strings vibrate within an envelope that is wider in the middle than at the ends.) The difference between angles s and n is the angle alpha, which we'll call the action angle.

I have neglected the height of the grin but this wont matter much. You can figure it in, if desired.

BC is a line, not exactly the face of the tin but a horizontal line floating "above" the face, at the height of the rim.

Let's write down some measured or likely dimensions:

bridge height: 13 mm
rim height: 3 mm
neck length, chin to rim: 470 mm
bridge to rim: 150 mm

So the length of line AB is the bridge height minus the rim height, or 13 - 3 = 10 mm. The distance A-E is about 150 mm. It's not that exactly but we can approximate it so, since the radius and the cosine are pretty close to the same at small angles like this. The height of point E above the table is then 150 sin(s) or just 150 s, since the sine and tangent functions are also pretty close to the angle in radians. The clearance CE is this height subtracted from the length of AB, or 10 - 150s. Now the action angle alpha can be calculated from the clearance CE and the neck length CD; in radians it's just CE / CD, or approximately so. Then the neck angle n is just the string angle minus the action angle, s - alpha.

Let's use a spreadsheet to map out the territory. First, generate down the left column a series of string angles from say, 1 to 3 degrees. Then in the second column convert these to radians. In the 3rd column, calculate the clearance by the above formula. 4th column, calculate the action angle, and 5th column, the neck angle. The last column just converts the neck angle back to degrees.

So to get a clearance of 5 to 6 mm, we should set the neck angle to be about 1 degree.(yellow area.) Somehow I guessed that correctly; probably just from looking at some banjos in the store.

If this gets us anywhere near, we can fine-tune it via bridge height if desired.

Of course this all depends on the exact geometry of your banjo. YBMV

As a sanity check, if we run this spreadsheet out a bit, the string angle and the neck angle will be exactly the same at the point where the clearance goes to zero. And this is so:

_____________________

Tuesday, December 21, 2010

Homemade Cookie Tin Banjo, part 12

..
Looking at the title here, "Homemade Cookie Tin Banjo", reminds me that my uncle had a housekeeper lady named Marie. Every year about this time she'd make something like 2000 sugar cookies and decorate them by painting them with liquid frosting of various bright colors. There were Christmas trees, angels, snowmen, stars, and of course Santa. She used paintbrushes to paint the frosting on. And they sat out for a while drying. The whole dining room table was covered with them and the family ate somewhere else. Then she'd pack 'em into these cookie tins just like this one and give them out as gifts. Oh, man, were they good.

Next comes the task of carving the neck to that same cylindrical shape, but concave. I didnt think of a good table saw trick in time for this one. Found a good tool tho:

This is actually a little sanding cylinder tool that comes with the Dremel kit, but it works fine in the drill press.

______________

Monday, December 20, 2010

Homemade Cookie Tin Banjo, part 11

..
Banjos have such a fun, distinctive sound that they have become a standard item in almost every real band. The usual paradigm is to pick it fast and wild, altho it can be played slow and sound pretty sweet. The sound sort of symbolizes the idea that country boys arent finely educated nor carefully trimmed; but they have extraordinary energy and vigor and are full of fun.

Now that the epoxy's cured, the next step of our construction is to trim the inside part down to fit. The tin has a lip but that's not a problem, if the wood piece be trimmed to exactly the right size, I can get it inside by deforming the round tin slightly.

To trim it just right, I cut a scrap of pine and drove a nail thru it like this:

Then it was a simple matter to drill a hole thru the inside piece, exactly in the center...


Now place the inside piece on the nail sticking up, and holding the pine board firmly against the fence, (a little strip tacked onto the pine board right next to the fence helps here) run it thru the saw. Adjust it so it just removes a little bit of the length. Turn the piece around on the nail and you get a nice circular shape on both ends. Keep fingees outta that red area.


Now try it. Doesnt fit; so move the fence a millimeter or two and saw it down more. Remember, cutting on both ends reduces the length by twice the amount you move the fence so proceed with savvy.

About three passes thru the saw and it did fit exactly.
_________________

Sunday, December 19, 2010

Homemade Cookie Tin Banjo, part 10

..
Now, mixing up some 5-minute epoxy and gluing the blocks together. No need for a lot of clamps.

You might say I have just one vice.

__________________

Saturday, December 18, 2010

Homemade Cookie Tin Banjo, part 9

..
Next step is to glue the square blocks to the other two pieces. I planned to use 5-minute epoxy rather than regular wood glue. First, I want it to be waterproof, just in case, and second, the extra strength might be necessary. Remember I'm going to put a bolt thru this and tighten it pretty tight; not sure how much force that will exert on the joint... say on the order of 500 newtons or something. Then on top of that I'm going to be pushing on the neck of the banjo, wrenching it; possibly bringing the force much higher.

Looking at the surface of this wood, it's really hard and smooth; how much is glue going to soak into it? So I roughed it up. I used a little bit I have chucked in the Dremel tool, but a knife or a hammer and nail would work fine.

While we're looking right at this, the board was sold as a "1 x 3" meaning 1 inch thick by 3 inches wide. It isnt anywhere near that. That's the dimensions of a board when it's cut out of the log. Then it's passed thru a planing machine and it gets smaller. This was 0.75 x 2.5 inches. That has always bothered me.

The 2.5 inches wasnt even uniform, it varied along the length of the board. The corporation that sold me this didnt care about that, only about getting my money.

By the way, everybody thinks it's a marvelous idea to go to a "paperless society". What will happen if we do? The paper mills will close, and the pulp mills will close, and the market for wood will be vastly reduced, and so the lumber companies will sell off their forests, and houses will be built on the land. If you are all concerned about global warming and everything, you should not be worried about printing some long document and "killing a tree". You kill a tree this way, they plant another tree - because it's profitable to do so.

Actually, if the CO2 component of our atmosphere were to go up by 1%, the plant life on this planet would flourish like crazy, and people would become sleepy - so there'd be fewer wars.

________________

Friday, December 17, 2010

Homemade Cookie Tin Banjo, part 8

..
Now it's time to actually start doing something.

I have a table saw. Now you see that red area, that is a little improvement I made to the saw. I masked it off - 10 cm all around the blade - and spray painted it red. I made a rule for myself that my hands never go into that area unless the saw is unplugged from the wall and I know it's powered off and I can see the plug.

They have blade guards that come with the table saws but I don't like them. I've been using this arrangement for several years and have not yet lost a finger. The red color constantly reminds me of what can happen if I put my fingers in there.

If I keep my fingers out of there it can't happen.

I cut the plank into lengths: 57 cm, 20 cm, and two 6 cm pieces - this can all come out of a 4 feet length with room for three saw blade widths, plus a full foot of extra wood left over for something else. In other words, I didn't need a 4 foot plank, just a 3 foot one; I overestimated.

That's better than underestimating. I was lucky. Because much experience has taught me how to maneuver so as to often be lucky.

Einstein couldn't believe that God would play dice with the universe, but why not? If you play smart and bank on odds of one gazillion to one, with backup plans just in case, it works out well. That's the way I operate every day, why shouldn't God?

If all the molecules of milk in the top half of my glass all happened to go Up at the same time, the milk would shoot out all over the place. Then the bottom half would hit the bottom and bounce up right after the top half. But it's very unlikely, and if it did happen, I have a towel.

_____________

Thursday, December 16, 2010

Homemade Cookie Tin Banjo, part 7

..
My cookie tin is 203 mm in diameter (8 inches), quite a bit smaller than your typical commercial banjo drumhead, so I am making some kind of a tenor banjo here.

I measured several guitars and looked especially at a smaller guitar I have. I bought it for a daughter who was fairly small, but she never loved it, because it flat doesn't sound very good. Instead, she liked my nice Woodbine and borrowed it so much that I finallly just gave it to her. Leaving me with the small 3/4 size guitar which, like a stuffy society lady, looks good but isn't really capable of much. At any rate, the string length, bridge to nut, on your typical classical guitar is about 25.5 inches. This little guitar has 23 inches there. So for my banjo I settled on a string length of 24 inches or 610 mm.

But I have big fingers. I don't even like to play American-style steel-stringed guitars - neck too narrow, strings too close together. My favorite guitar is a cheap classical model that wouldn't even play when I got it - I had to saw off the neck and bolt it on better - and I put metal strings on it which gives a very nice sound and the wide neck is easy to play. I don't know why they make guitar necks so narrow when the flamenco artists have demonstrated conclusively that wider is better, but I'm not about to perpetuate the same kind of narrow constriction on this banjo. I measured the string dimensions on that perfect guitar and laid them out in my plan for this. The guitar strings are 8.5 mm apart, based on a total of 42 or 43 mm for six (five spaces). You can measure things very, very accurately by taking several measurements in several different ways and averaging. The neck is 50.8 mm across at the nut.

Here let me say that I don't like this nutty terminology. Parts of the guitar or banjo are named by comparison to the body of a person or animal; the head at the top, neck, body, and tail are all named on this plan. Then we have the little bar between head and neck, the strings pass over it. Why would this be called the "nut"? Someone didn't know their anatomy...

From now on, I'm going to call this thing the Grin, whether on a guitar, banjo, violin, etc. Because it's often made of a white material like ivory, and it has divisions so it looks like a set of teeth on someone grinning.

Importing then the separation of 8.5 mm string to string gives a neck width of 34 mm at the grin (four strings, and same margin outside them) and 42.5 mm at the cookie-tin end of the neck (five strings). I laid these dimensions out on my oak plank.

____________

Monday, December 13, 2010

Homemade Cookie Tin Banjo, part 6

..
So I headed out to my local "woods" and obtained a plank. The choices were red oak, pine, poplar, and maybe something else. I was thinking maple but didn't see any so I settled for red oak. Grouch, grouch, grouch; our modern civilization is all made of heartless corporations that don't care about your homemade chair or table or banjo; all they care about is the bottom line, which is profit. They don't carry a variety of woods in a variety of sizes. Mostly what they carry is this sawdust board rubbish.

I didn't actually cut the plank myself, a guy did that for me. Nice fella, didn't charge me for cutting it. They charged me pretty fierce money for the plank tho.

Also, I paid a visit to my local used instrument store, where they repair and sell old broken guitars and things. When someone brings in an instrument with, say, a faulty tuning peg, they might take all the old pegs off and put new ones on. The old ones go into a box, and since I am friends (or family) with most of the people there, they let me rummage thru the box. And I came up with some gearless friction style pegs, which I have drawn and measured as follows:
There wasn't a complete set of any one style but I managed to put together a mixed set and got four with at least the same color of white knobs. The fifth one on the neck will be black. Which will be funny since that's an innovation by white people.

I'm going to use metric units from here on. Just because I can. In 1955, IIRC, Congress passed a resolution that America should go metric within ten years. 55 years later we are still on English units.

In some ways, a big nation is like a Brontosaurus, a huge dinosaur with a little teeny brain. Brain gives the order to turn and the legs just keep marching straight on in the same direction.

It turned out there never was a Brontosaurus, they had the wrong head with this body, but it's a fact that we are still using 12 inches to the foot, 3 feet to the yard, 1760 yards to the mile.

_____________

Sunday, December 12, 2010

Homemade Cookie Tin Banjo, part 5

..
A banjo really should not be a commercial product at all. There should be some other name for that. The original banjos were homemade by people who had been dragged over to America as slaves and they were improvising some kind of musical instrument, based on memories of things they used to do back home, made entirely out of local materials obtained for free. The banjo has a peculiar sound that is a direct metaphor for this kind of endeavor - the flight of the captive soul via improvisation and struggle, thru music, into happier regions, however rickety the wings.

Apparently the white folks in America learned from the blacks, and started making the same kind of instruments. Pete Seeger said that people all over America were making and playing banjos; there was one in practically every cabin.

The Appalachian mountains are the backwoods of the country. Here the people were supposed to be pretty backward, and the banjos they made were fretless. Frets were too hard to make. So they developed this fretless type into a high art, finding great love and wonder in the process.

It appeals to me to try to make some kind of banjo on this same paradigm. Also, as I explained, my song recording needs a banjo part, and the homlier the better.

What all this boils down to is an excuse not to put any frets on this thing. Yay!

_____________

Saturday, December 11, 2010

Homemade Cookie Tin Banjo, part 4

..
There used to be column in Scientific American called "The Amateur Scientist" and one month there was an article about homemade telescopes and observatories. The author had made many pieces of equipment for his observatory and he said that you should draw it out first. If you can draw it you can probably make it. I thought this was a remarkably good idea and I've adopted it and used it many times over the years.

When I started drawing out the design for the neck, a different idea came to me:

The neck could be made in two parts, inside and outside, and bolted together. This means no rectangle need be cut out of the tin, just a small bolt hole drilled.

The wood construction looks pretty easy, just some extra blocks glued on. And a hole drilled thru and a bolt put in.

And it puts the internal truss way far away from the vibrating tin face.

It also allows me to slant the neck down (which ought to make the action* a bit better) without having to carve the whole thing out of a fat timber to get this, just need a typical thin plank.

Looking at a few commercial banjos, their necks do slant down slightly so that was apparently a thought others had also.

* Action: distance between strings and fingerboard/frets.
_____________

Monday, December 6, 2010

Homemade Cookie Tin Banjo, part 3

..
Another little problem I had with the design as given was cutting a rectangular hole thru the side of the tin. Like that author, I don't have a well-equipped machine shop and I envision winding up with a rather irregular edge on the hole, look bad cut fingers make papa-san cuss which is against his religion.

To make a long story short (too late! the people cry) I came up with this idea. I thought maybe there could be a flair on the neck, ie. a wider and deeper place just outside the tin to cover up the edge of the hole.
Looking thru the archives of the Musical Instrument Makers' Forum, I see that someone else had this idea too. So it might not be a bad idea.

_______________

Sunday, December 5, 2010

Homemade Cookie Tin Banjo, part 2

..
It seemed to me that putting screws thru the drumhead to secure the inside part of the neck would tend to dampen the vibes of the drumhead, or effectively reduce its size.

I thought there should be a way to secure the neck on just the sides of the cookie tin.

A banjo usually has an animal skin stretched very tight over a frame and there are provisions for tightening it. Modern commercial banjos use a system of about 20 fancy screws around the perimeter, the tension can be adjusted to exquisite perfection. (And they probably use some synthetic animal.) Homemade ones usually just stretch the skin over a wood frame with tacks, and depend on the natural shrink process of the skin as it dries out to tension it. On cold foggy days the banjo has to be warmed by the fire before it will sing, I 'spose, like a drum.

The bottom of a cookie tin is just a sheet of metal, humidity has no short term effect on it; it's held nicely all around by a crimped seam. Why destroy such a perfect setup?
_____________

Saturday, December 4, 2010

Homemade Cookie Tin Banjo

..
I liked this story of the Cookie-Tin Banjo. I need a banjo. I've written some cool words for "Foggy Mountain Breakdown" and I want to get it recorded but I don't have a banjo player that I can get into the studio right now. So my solution is to learn the banjo and play that part myself. And I don't feel like shelling out for a commercial banjo altho I have seen one that's totally delicious. So this solution seems kind of attractive in a strange way. I have several old cookie tins. I selected one and began to make plans.

The instrument detailed in that story looks about like this:

(click to enarge - I can't seem to get this stupid blog website to cooperate)

I added the little extra flair on the head. Somehow just the end of the plank trimmed down doesn't quite look as good as what luthiers are putting on instruments these days...

Then I thought about what makes a banjo. The central element is a small set of plucked strings, their effective length modified by fingers pushing them against frets. The vibrations of these strings are amplified by a drumhead, a membrane stretched over a frame. It's often an animal skin but as this story demonstrates, a piece of sheet metal also works. The amplification is simply a matter of mechanically transferring the vibrations to the drumhead; there's no real amplification where power is added.

I will be continuing this story in the following days. Stay tuned...

_____________